Simple Supply Chain I
Synopsis: Use Dyn365FO for a simple procure-to-pay configuration and transactions
Prerequisites:
- Access to a Dyn365FO subscription with Contoso demo data and fairly broad privilege to access modules, create records, and run transactions. A TechCats Dyn365FO subscription suffices but is not a requirement.
- Understanding of the Dyn365FO journal entry posting process (e.g., A Second Dyn365FO Session and / or Dyn365FO Session 3)
- Establish a Business Unit in the USMF company and remember your Business Unit Number (e.g., A First Dyn365FO Session)
Notes:
- In 'real life' use of an ERP it would be highly unusual for a typical user to have responsibility and authority to process such a wide range of transactions; security rules would limit them to actions associated with their role function in the enterprise. Our goal, however, is to to see how Dynamics operates so your user login has been given a wide variety of privilege and you are being exposed to a broad set of tasks.
- For our tiny and simple business an ERP is a bit of overkill: we probably would not bother with the data entry and documentation required by the activities below to sell a few items since we could easily keep track of things with pencil-and-paper or an Excel worksheet*. Our goal, however, is to see how an ERP automates business processes, provides for separation of tasks and duties, and maintains audit trails and 'memory' for the organization.
*A well worn joke in the industry is that ERP stands for Excel Replacement Project since, often, it is a set of spreadsheets that is providing the functions of an ERP while an enterprise is growing big enough to need a full-function ERP.
- For adding records and posting transactions it is critical they be done once and only once. If you aren't sure something was added or posted, look it up. It makes no sense to make multiple entries 'just to be sure'; in fact this will just establish incorrect information.
- Complete all the work in the USMF company and be sure to associate all your transactions with your business unit; this segregates your work from others at Contoso. Note that the examples below use business unit 103 but yours will almost surely be different.
Scenario used for the next several exercises:
At your university some courses have students work with a Dyn365FO virtual machine they run 'locally' on their own computers. This requires download and configuration of a large virtual hard drive onto a portable hard drive (PHD). Having individual students in the courses do this themselves is time consuming and error prone so the course instructors have asked that configured PHDs be available for sale to students and faculty your university bookstore. You have a firm order in hand from the bookstore to stock 30 PHDs at a 25% markup from the cost of the physical PHDs and a couple of campus departments may be interested in purchasing some as well. The exercises walk through configuring the ERP and executing transactions to support this activity.
The exercise guidance below is meant to supplement the video Dyn365FO Simple Supply Chain I which provides step-by-step guidance of "look and feel" for these exercises working with Dyn365FO.
- Setup a bank account
- We have opened a bank for our business unit and need to establish it in Dyn365FO. Opening an account with a bank would provide us among other things a routing number and bank account number (e.g., see Bank Routing Numbers) but we will use fabricated values based on your business unit: Routebbb and Bankbbb where bbb is your business unit number.
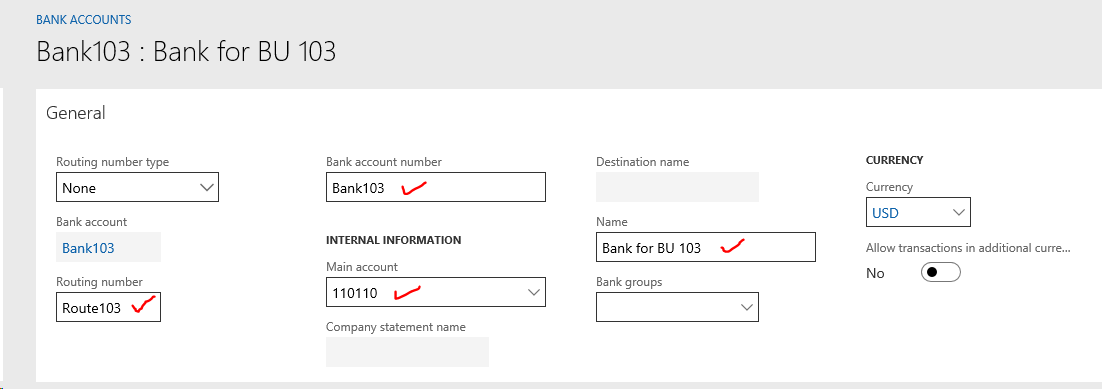
- To create a bank account in Dyn365FO for your business unit navigate to Modules | Cash and bank management | Bank accounts. Click +New and use Bankbbb where bbb is your Business Unit number for Bank account (the ID of the bank account in Dyn365FO) and Routebbb and Bankbbb for routing and bank account numbers (see previous comment); name your bank account something like Bank for BU bb. In addition be sure the bank account has 110110 as its Main account (i.e., postings made to this bank account will be recorded in the USMF Cash Account in the general ledger). Other entries can default. Note: you will get a warning about multiple banks using account 110110 for reconciliation; for us this isn't an issue.
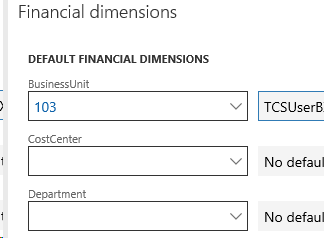
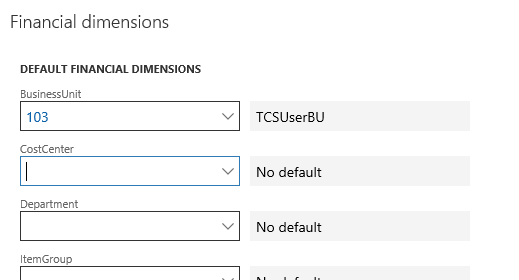
- Scroll down to the Financial dimensions tab for your bank account and enter your BusinessUnit number as a DEFAULT FINANCIAL DIMENSION; this will associated postings to the bank account with your business unit.
- Save your entries.
- Post working capital
On April 1 of this year Contoso provided your business unit $10,000 working capital deposited directly into your bank account. To record this event in the ERP we can use General Ledger voucher (e.g., see A Second Dyn365FO Session item II) but in this case the voucher Account type will be Bank (rather than Ledger) and the posted account will, naturally, be a debit to your bank. As the offset use 300120-bbb Paid-in Capital and be sure this entry is associated with your business unit bbb. Validate and post the transaction.

- Establish a warehouse for your business unit's inventory
To automate tracking of product inventory an ERP uses sites, warehouses, bins, and similar artifacts. A site is typically where production of products occurs and a warehouse is a location at the site for storing inventory. Although the image of a site / warehouse is a large factory / storage building that's not a requirement; for us, our site is an IT lab we have been allowed to user for creation and storage of our PHDs and our warehouses are individual lockers in the lab.
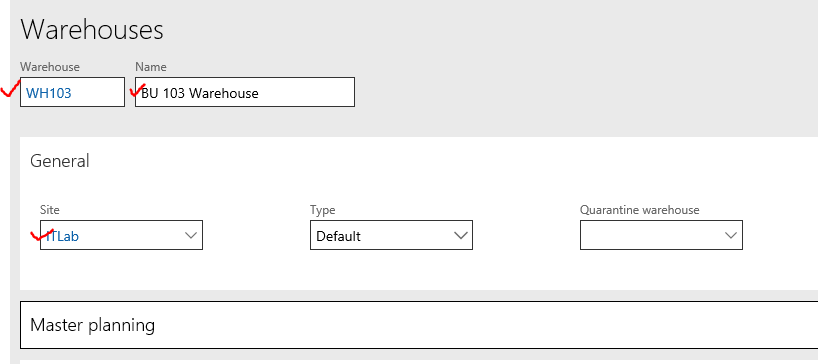
The IT Lab site has already been configured in the ERP so to add your warehouse use Modules | Inventory management | Inventory breakdown | Warehouses and click +New. Code the warehouse WHbbb and name it BU bbb Warehouse (where bbb is your business unit number) and assign the warehouse to the ITLab site. That's all that is required so click Save or just exit when done.
- Establish and release your PHD product
A product is a fundamental entity within an ERP and establishing one requires identification of many of its attributes to facilitate business processes that use it. Follow these steps closely to prevent issues and back-tracking later on.
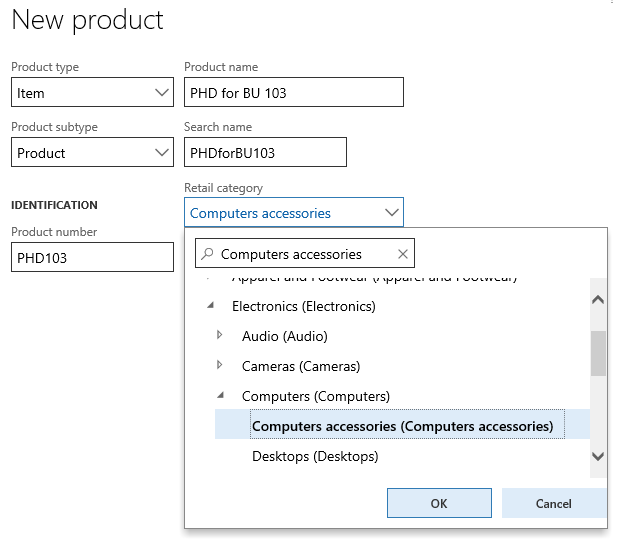
- In Dyn365 FO, navigate to Modules | Product information management | Products | Products and click +New. In the New product dialog choose Product type of Item, Product subtype of Product, make your Product number PHDbbb and Product name PHD for BU bbb (where bbb is your business unit number). For Retail category choose Computers accessories (under Electronics | Computers) and leave CATCH WEIGHT as no. Click OK on the New product dialog.
- On the Product Details dialog (which will appear or navigate to it if it does not) use the Dimensions groups pull-down to set Storage dimension group to SiteWH and Tracking dimension group to None (this indicates we will store this product at a site / warehouse level but not track its location as it's being processed). Click OK on the pull-down when done.
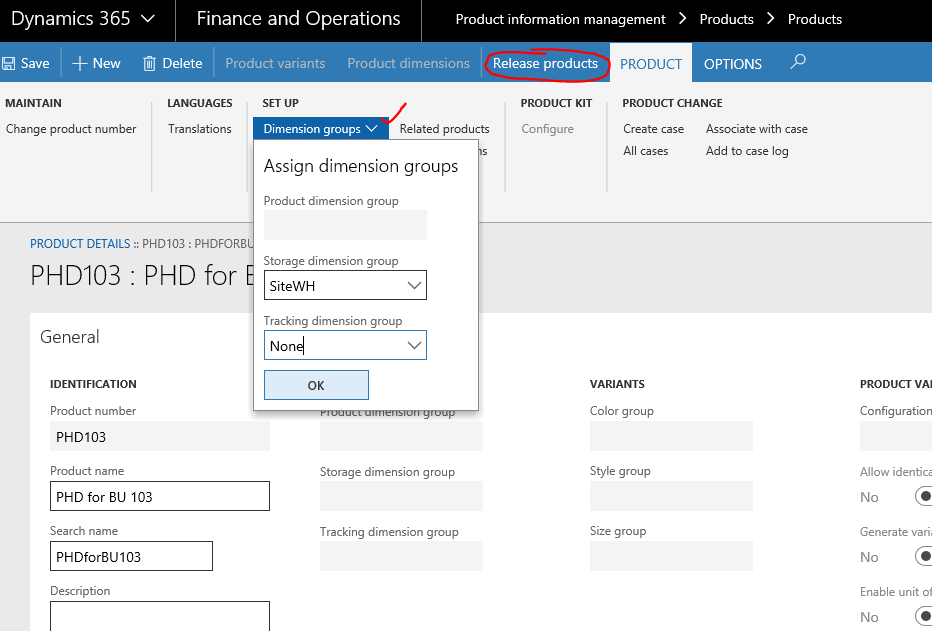
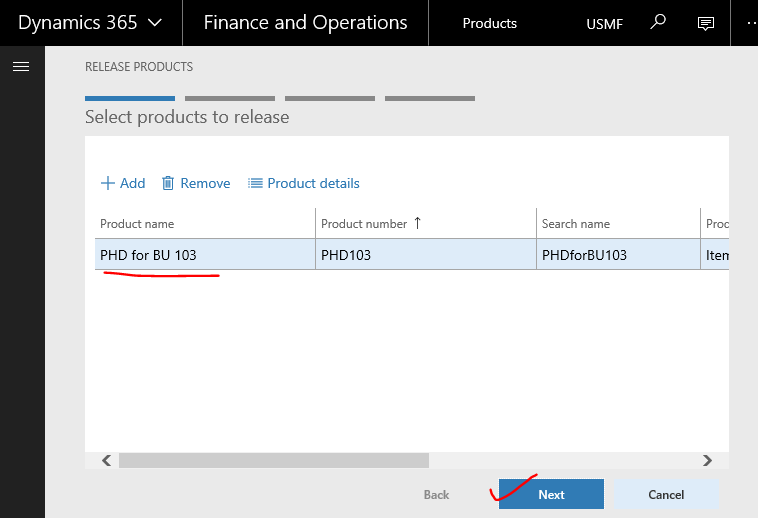
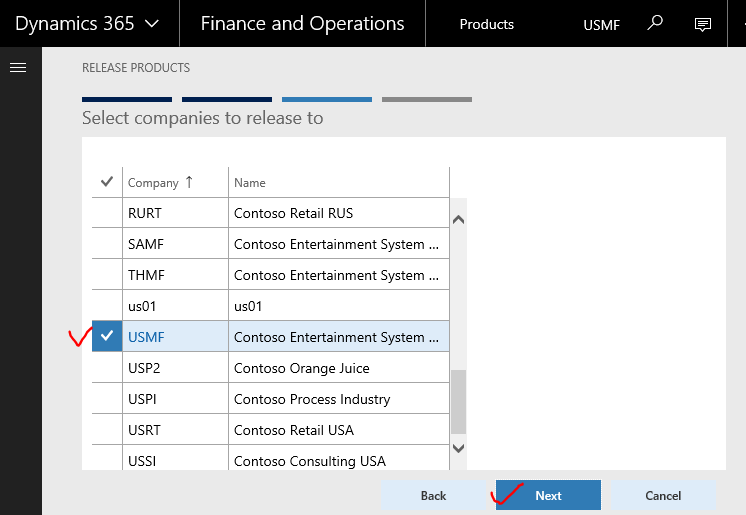
- The product needs to be released to be available to the ERP. From the Product Details dialog click Release products located in the darker blue menu bar. Your product (and only your product) should appear and be pre-selected so click Next at the bottom of the screen. On the following choose USMF (the only company to use this product) and click Next. A dialog (not shown) will appear confirming one product and one company selected; leave other items at their default and click Finish. This system will make the updates needed to release the product to the selected companies.
- Navigate to Modules | Product information management | Products | Released products, find your product on the list, and click the Item number to open its details and click Edit on the following Released Product Details dialog to update the released product.
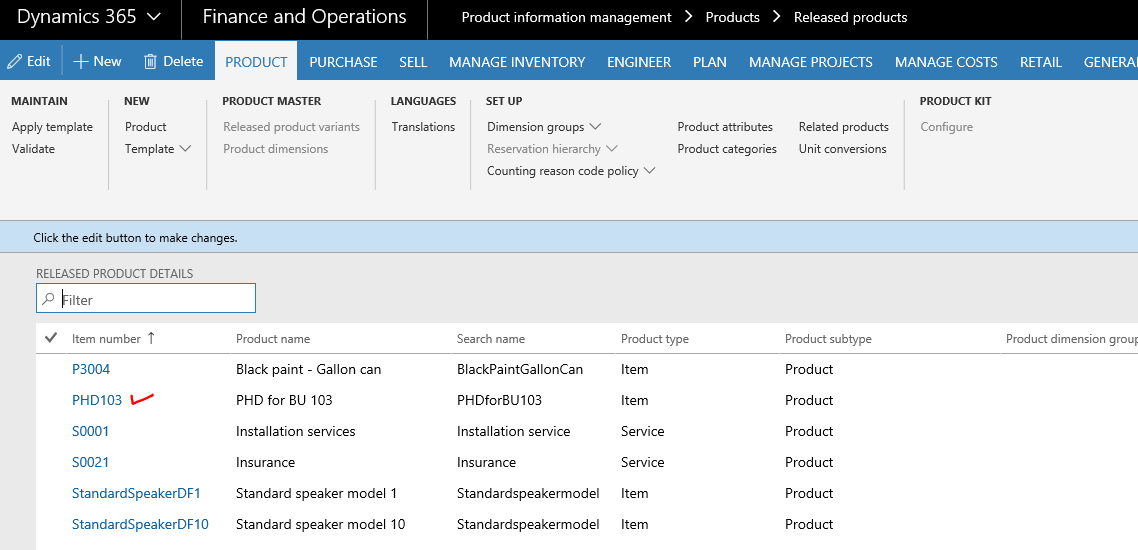
- On the General tab make Item model group LIFO (indicating that inventory costs will be based on the last items purchased)

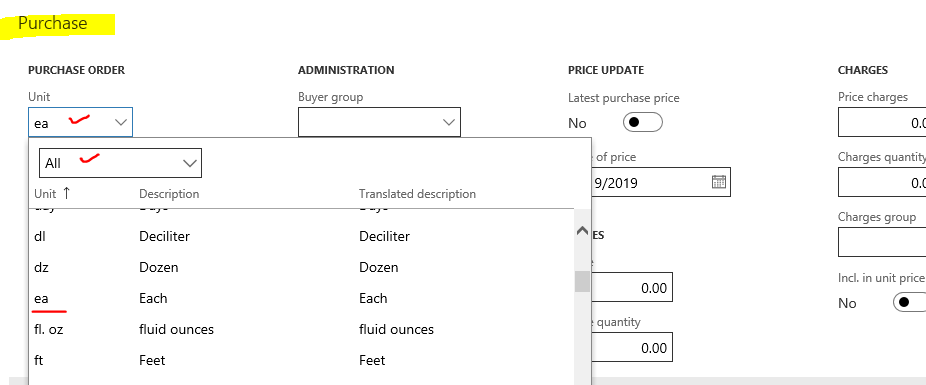
- On the Purchase tab set the Unit field ea (for each). To see this in the pull down menu be sure to choose All instead of Convertible on the second-level pull down. Make this same update for Unit on the Sell tab and the Manage inventory tab.
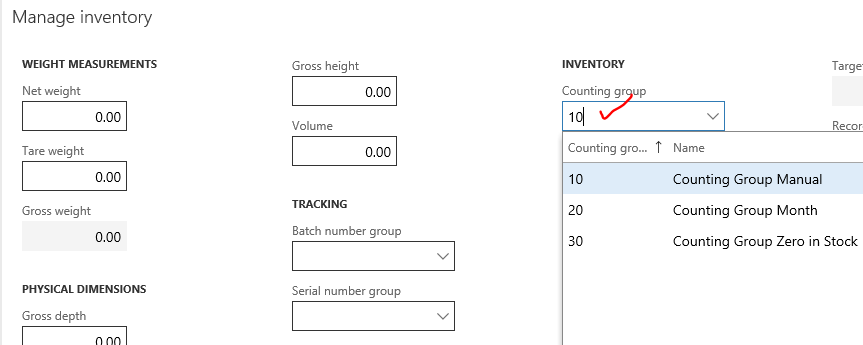
- On the Manage inventory tab make Inventory | Counting group 10 (for manual counting)
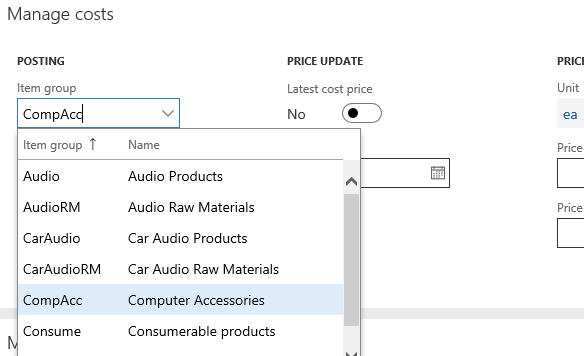
- On the Manage costs tab make Posting | Item group CompAcc
- On the Financial dimensions tab set Default Financial Dimensions | BusinessUnit to your business unit
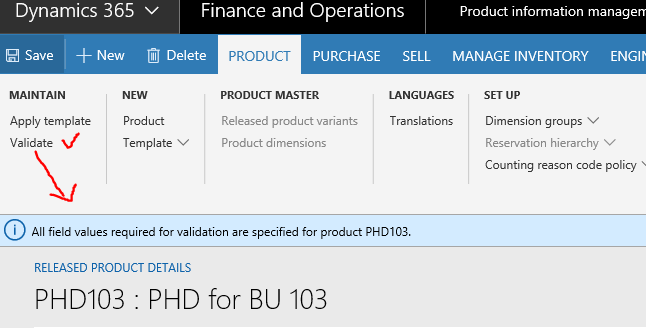
- After checking entries use Validate on the Product menu to verify required fields have been entered. If all is well you should see such a message appear after validation.
- Establish a vendor for hard drives
ERPs are 'formal' about purchasing and typically require recording details of the process in the system. There are also some chicken-and-egg issues (e.g., a purchase of an item can't be entered into the ERP until the item (e.g., product) and vendor have been created. This provides an audit trail and establishes entities which can be re-used. Sometimes this information can be captured electronically but often the entries required are manual.
In a real-life enterprise, finding one or a few best vendor(s) and then having each business unit use that (those) vendor(s) is a key advantage of an ERP, allowing the enterprise leverage in working with the vendor(s). In addition, there is only one Best Buy or Amazon so if the enterprise purchases from them this vendor should be entered only once, saving duplicate records and helping with data integrity. For learning purposes in our case, however, each business unit will find and create their own vendors even if the vendor is a duplicate of another business unit's.
Do some research (e.g., internet shopping, browse ads, or visit stores) and find a portable hard drive of at least 500 GB as the drives you will use for your first purchase. Keep the drive and vendor details handy for establishing a vendor and processing the purchase in the ERP. Your vendor may be online or brick-and-mortar.
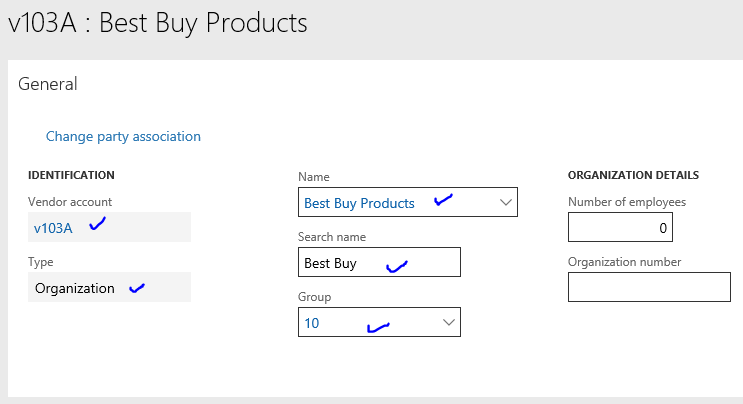
- Use Modules | Procurement and sourcing | Vendors | All Vendors and click +New to begin the vendor entry. On the General tab code your vendor account as vbbbA where bbb is your business unit number and A indicates the first vendor identified for our business unit. Enter your vendor's name and a a search name (not necessarily Best Buy; whatever vendor you have chosen). Use Group 10 (parts vendors) and for Type indicate whether your vendor is an organization or a person.
- Use the Addresses tab to indicate a physical store location or company location (this can be left blank, e.g., for online vendors). Note that the Primary column indicates whether this is our primary address for the vendor (and not whether this is the vendor's primary address like a headquarters) so with only one address Primary will have to be yes.

- Use the Contact information tab to provide a URL, email address, phone, or other contact for the vendor (you should have at least one although as configured the system does not require one)

- On the Purchase order defaults tab set Site / Warehouse to ITLab / WH103 and use the Vendor account as Our account number.

- On the Payment tab our Terms of payment are Cash and Method of payment ELECTRONIC (just for the purposes of the exercise)

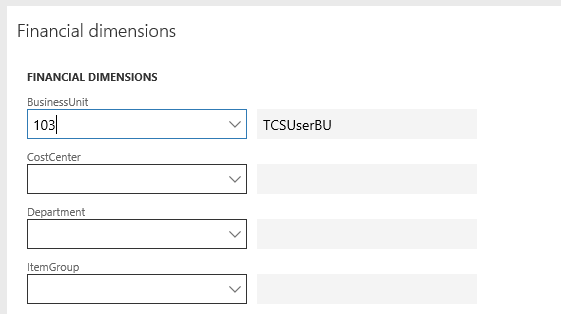
- Use the Financial dimensions tab to tie your business unit to this vendor.
Save the vendor record when done.
- Purchase hard drives
With a firm order of 30 PHDs and prospects for more sales you plan to purchase (and configure) 50 PHDs. Perhaps you visit a store and purchase the PHDs which we'll pretend they deliver or maybe they were an online order that got delivered, paying with an electronic transfer when you are presented with a total at checkout. You put the PHDs in their 'warehouse' (i.e., locker WHbbb in the IT Lab) for configuring later. As we will see, ERPs are formal, even stodgy, about managing purchases requiring several steps for validation and approval. There are reasons for each step and ERPs can be configured to streamline or automate these processes if they are routine, part of the point of ERPs. For now lets put up with the structure to see how they can provide controls in a large enterprise.
- A purchase order records the intent of an enterprise to make a specific purchase. Informally, you planned on getting 50 PHDs from the vendor you established.
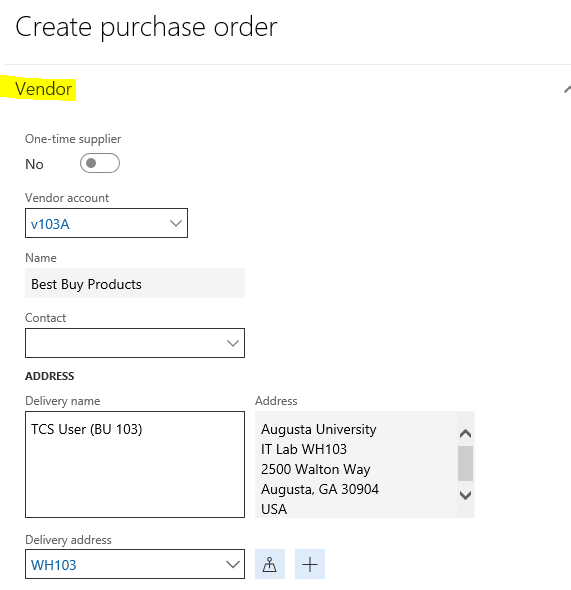
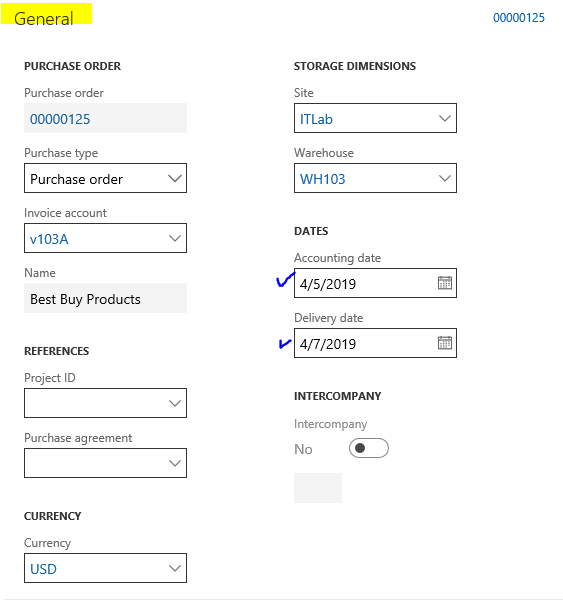
- On April 5 of this year you initiate your purchase for delivery on April 7. In Dyn365 FO use Modules | Procurement and sourcing | Purchase orders | All purchase orders and click +New to start the creation of a purchase order. On the Vendor tab choose your vbbbA Vendor account; use the + next to delivery address to craft an address labeled by your warehouse ID of WHbbb. On the General tab most of the values should be assigned (like Purchase order) or self-populate (like Site / Warehouse from the vendor record). Be sure to change the Accounting and Delivery dates. Click OK at the bottom of the dialog to continue the PO.
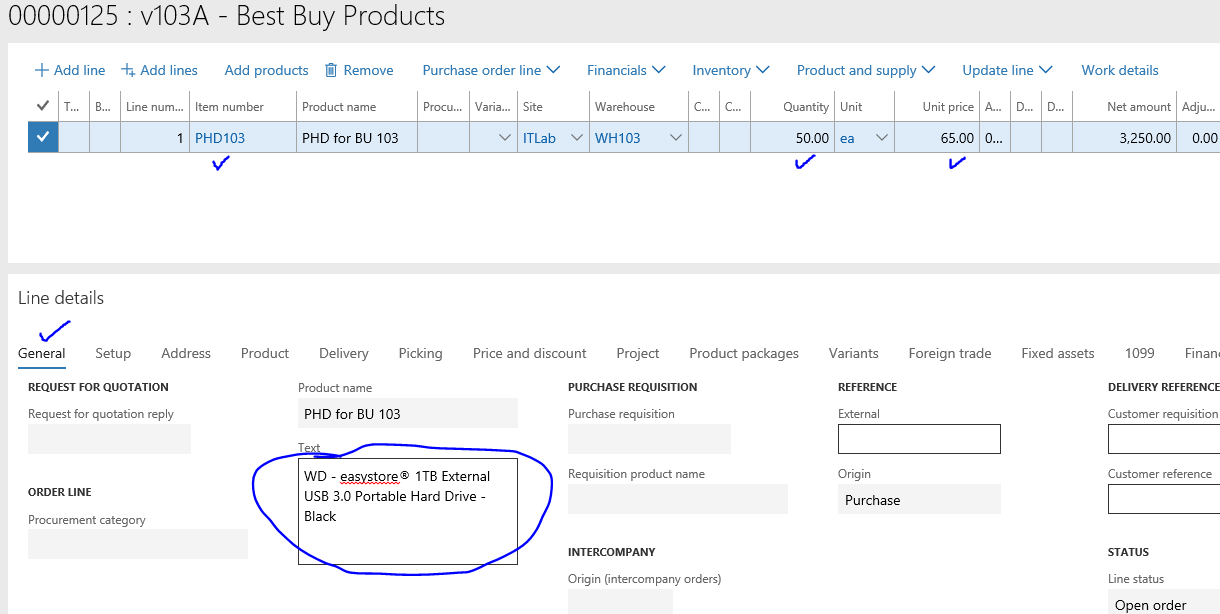
- Our Purchase order detail will have one line. Choose your item number, enter 50 as the quantity, and for Unit price use the price you found for PHDs. Use Line details | General to add text indicating the model of PHD you are ordering. There is much more that could be specified depending our business process but we have what we need for now so click Save or exit the form (you might make a note of your PO number for later reference).
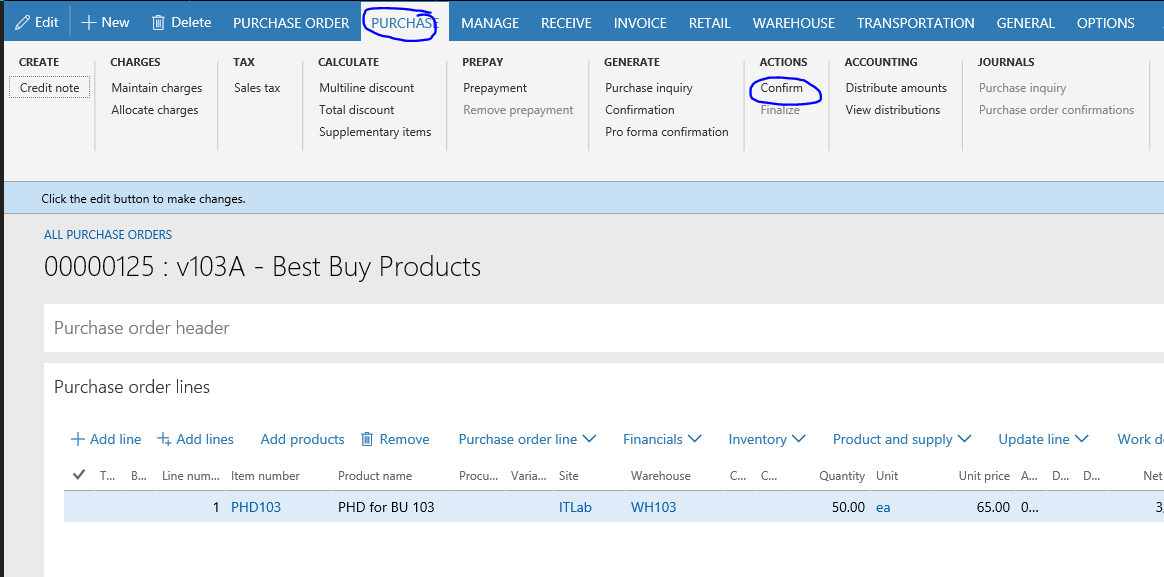
- The PO needs to be confirmed. In most enterprises PO confirmation is a done by a different role (i.e., person) than the PO creator, a division of duties control; you have the unrealistic authority to complete all aspects of the process. Get back into the PO (if you exited) using Modules | Procurement and sourcing | Purchase orders | All purchase orders and selecting it from the list. Click the PURCHASE tab and Confirm under ACTIONS.
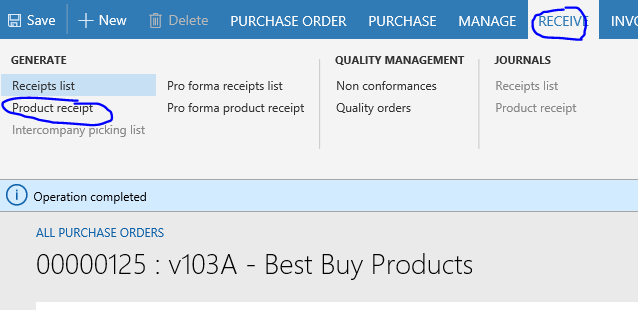
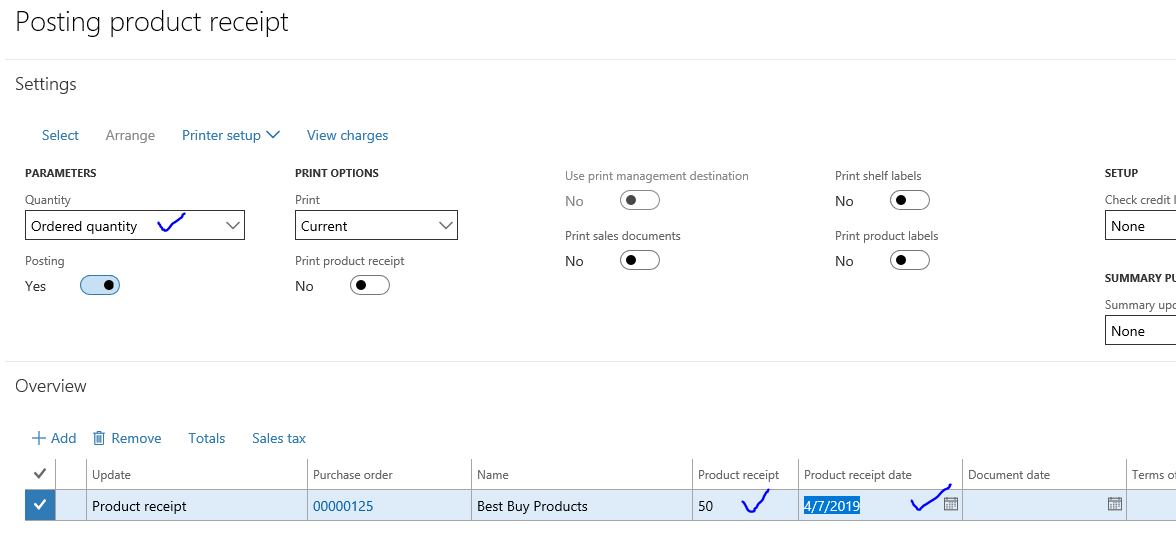
- The confirmed PO actually provided the authority from the enterprise to go make the purchase. After some time has passed the items are received and this needs to be acknowledged in the ERP. Get back into the PO (if you exited) using Modules | Procurement and sourcing | Purchase orders | All purchase orders and selecting it from the list. Click the RECEIVE tab and Product receipt under GENERATE. On the following Posting product receipt dialog select Ordered quantity for Quantity, enter 50 for Product receipt, and enter April 7 of this year as the receipt date. Click OK at the bottom of this dialog to post this receipt.
- It may be instructive to do a trial balance for April of this year for your business unit [reference] to see the effect on the ledger for activities so far. Of course depending on the cost of your PHDs your values may be a bit different. Note: Your trial balance may show activity from other, earlier exercises which are not shown here; that is not a problem.

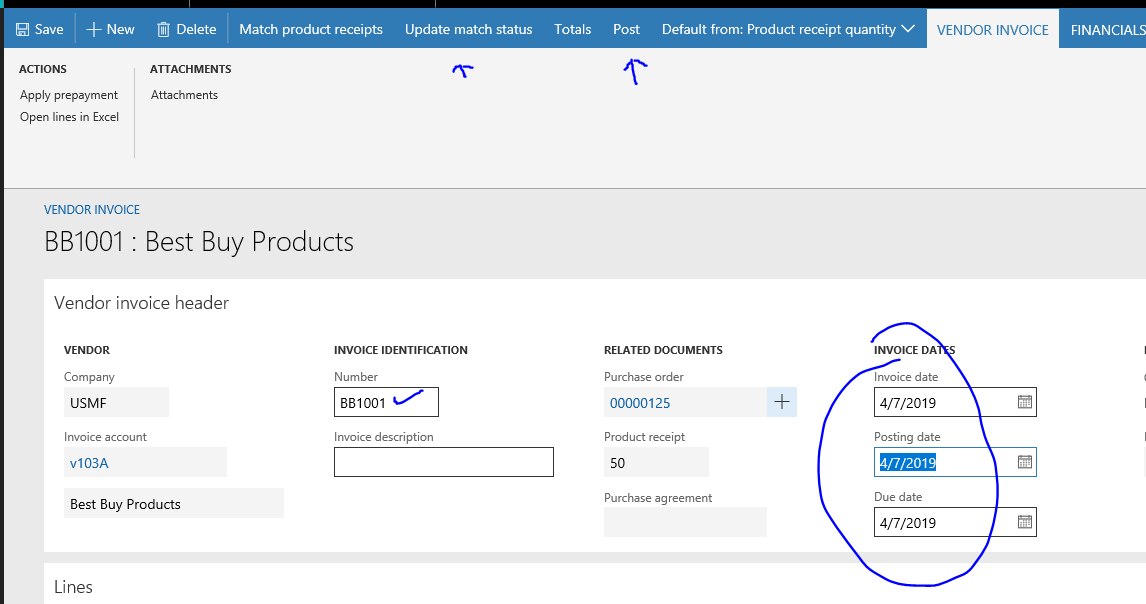
- In the scenario we have probably already paid the vendor e.g., while online or at the store) but that needs to be recorded in the ERP. So revisit your PO and choose INVOICE on the menu and Invoice under GENERATE. On the VENDOR INVOICE enter a value in Number under INVOICE IDENTIFICATION (this would be the number the vendor assigned, maybe on a receipt or invoice, that identifies this transaction in their system), update the dates, and use Post to process the invoice. Since we have setup our payment to the vendor as cash / electronic posting the invoice automatically posts the payment. If you get a message Update match status being required before posting then use that from the menu first.

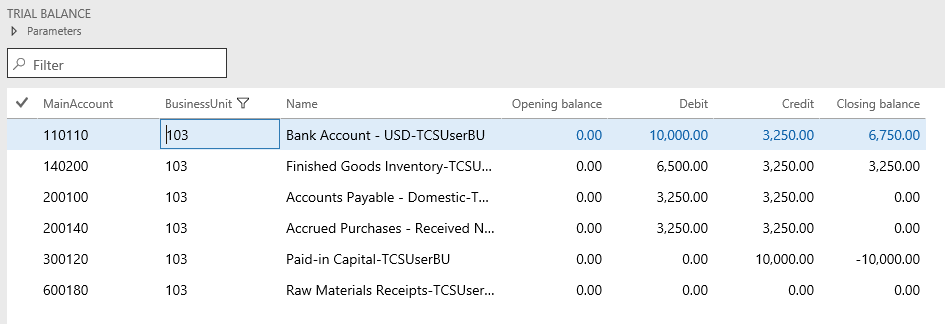
- Taking a look at the trial balance for April now shows that we have cash left in the bank account plus finished goods inventory (debits) balanced by our Paid-in Capital (credit). For reasons having to do with how accounting is applied there were entries that netted to zero to other accounts.
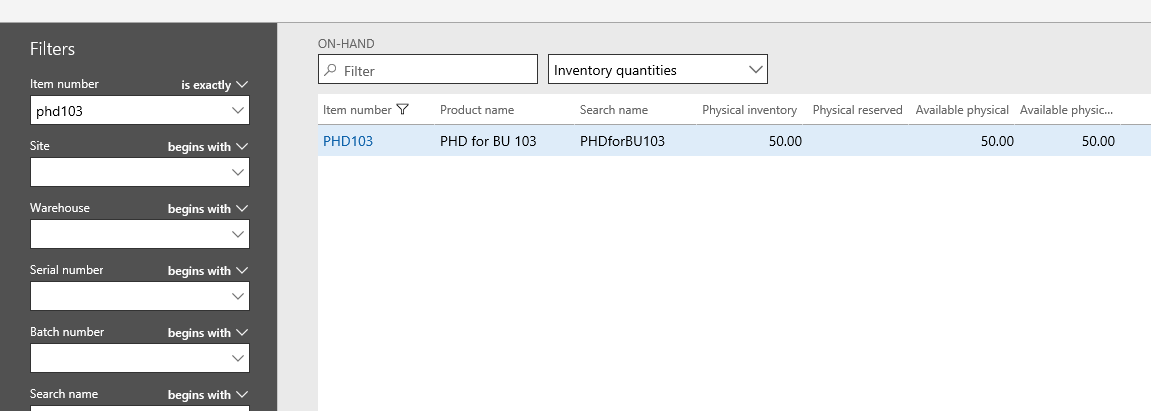
- As another look use Modules | Inventory management | Inquiries and reports | On-hand list and filter by your product's Item number PHDbbb to see the on-hand status in inventory.
