Dyn365FO Session 3
Synopsis: Post revenue & expense journal entries and produce mid-year financial reports
Prerequisites:
- Access to a Dyn365FO subscription with Contoso demo data and fairly broad privilege to access modules, create records, and run transactions. A TechCats Dyn365FO subscription suffices but is not a requirement.
- Understanding of the Dyn365FO journal entry posting process and and knowledge of your Business Unit Number (e.g., see A Second Dyn365FO Session)
- Exposure to the basics of accounting and, in particular, access to (at least) Chapters 1 thru 3 from Accounting Succinctly; we will be working from their first chapter example for our postings.
Notes:
- The sample transactions are adapted from an accounting reference book. They are intended to provide background and practice with posting journal entries but don't necessarily represent a realistic or typical set of transactions for Contoso (which is fictional to begin with).
- In 'real life' use of an ERP it would be highly unusual for a typical user to process journal entries and prepare accounting statements; security rules would limit them to actions associated with their role function in the enterprise. Even for accountants the ERP would be configured to post most of the journal entries automatically based on business processes; this promotes productivity and accuracy. Our goal, however, is to to see how Dynamics operates so your user login has been given a wide variety of privilege and you are being exposed to a broad set of tasks.
- For journal entries it is critical they be done once and only once. If you aren't sure something was posted, look it up. It makes no sense to record an increase to cash 2 or 3 times just to be sure it's entered; in fact this will just establish incorrect information.
- Be sure to associate all your transactions with your business unit; this segregates your work from others at Contoso.
- Since you have significant privilege, follow the guidance but do not change or delete records you did not add unless specifically instructed to.
The exercise guidance below is meant to supplement the video Dyn365FO Session 3 which provides step-by-step guidance of "look and feel" of these exercises working with Dyn365FO.
- Make the postings
- From Chapters 1 thru 3 of Accounting Succinctly, review the sample transactions in the section entitled "Let's Review a Few Examples" from p. 21-23 (p. 10-12 of the 3-chapter extract) and in particular the transactions on p. 22 (p. 11 of the 3-chapter extract).
- These happen to be revenue and expense transactions but since we are still using Dyn365FO GL to post 'by hand' you will post parallel transactions in your Dyn365FO subscription using the business unit you created earlier and then prepare a few financial statements.
- Recall your business unit number created earlier; accounts posted in this exercise should have your business unit as a 'financial dimension' in the account number.
- When posting transactions in General Ledger (GL) date the transactions as follows in the current year (even if that date has passed or has not occurred yet)
- date transaction A on Mar 1
- date transactions B and C on Mar 5
- date transaction D on Mar 10
- date transaction E on Mar 15
- Accounts for postings from Accounting Succinctly have been created in the USMF company but end with AS. So where the text says
- use account 1000 instead use account 1000AS
- use account 4000 instead use account 4000AS
- use account 5000 instead use account 5000AS
- use account 5100 instead use account 5100AS
- use account 5200 instead use account 5200AS
- use account 5300 instead use account 5300AS
and always include your business unit in the account ID (e.g., 1000AS-103 would be your cash account for posting sample transactions if your business unit was 103).
- Each transaction A thru E should be separate vouchers but putting them in the same journal batch is encouraged. Be sure the batch is posted with no errors. If you make an error entering the journal entries, bad entries should be reversed and appropriate, correct entries made.
- Posting the transactions
- Use the same process as practiced in A Second Dyn365FO Session; be sure to associate these transactions with your business unit and pay attention to dates.
- The screen cap below is an example for business unit 103; yours should be similar for your business unit.

- Validate and post and, as needed of course, back-out and correct any erroneous transactions.
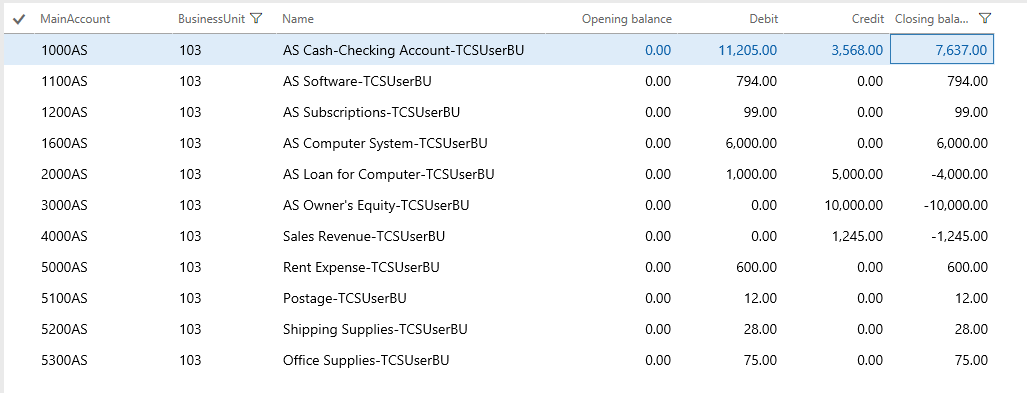
- Prepare a trial balance just to be able to check overall balances. In 'real life' there is no book answer to check against so accountants have a variety of methods and procedures for validating the accuracy of their books. But since we are just learning the posting process you should check your balances against the example below:
- Prepare financial statements
Although it is not end-of-period and we have not performed any closing entries (e.g., discussed in Chapters 1 thru 3 of Accounting Succinctly beginning p. 23 but do not post the closing entries described) DynFO365 -- like most accounting software -- can provide standard financial statements based on the data as they stand; in the case of Dyn365FO, statements can be prepared at the business unit level.
Financial statement analysis is an important topic but not one we go into here. In addition, since we put the Accounting Succinctly case into the Contoso accounting framework the reports don't come out 'pretty': lots of zero amounts and category names that don't quite match the case. This comes back to designing a chart of accounts another deep topic to take up later. Finally a good ERP like Dyn365FO includes a wide variety of tools for re-formatting and enhancing reports and generating new ones; this too can be looked at another day. For now getting reports with the correct amounts is the goal.
Dyn365FO uses a model for financial reporting where they are intended to be prepared once (e.g., at the end of a period) and the prepared reports can be referred to and analyzed as needed by users. In our case we will be generating our own company-wide reports and 'slicing' by our business unit but it turns out we'd get the same results if we 'sliced' someone else's report as long as they'd run the report after our posting was complete. In real life, financial statement preparation is done by only a few but a practical outcome for us is that we will see a lot of reports available; just choose the one you generated (or that was generated after your posting was complete).
- Prepare a Balance Sheet
- Navigate to Modules | General ledger | Inquires and reports | Financial reports
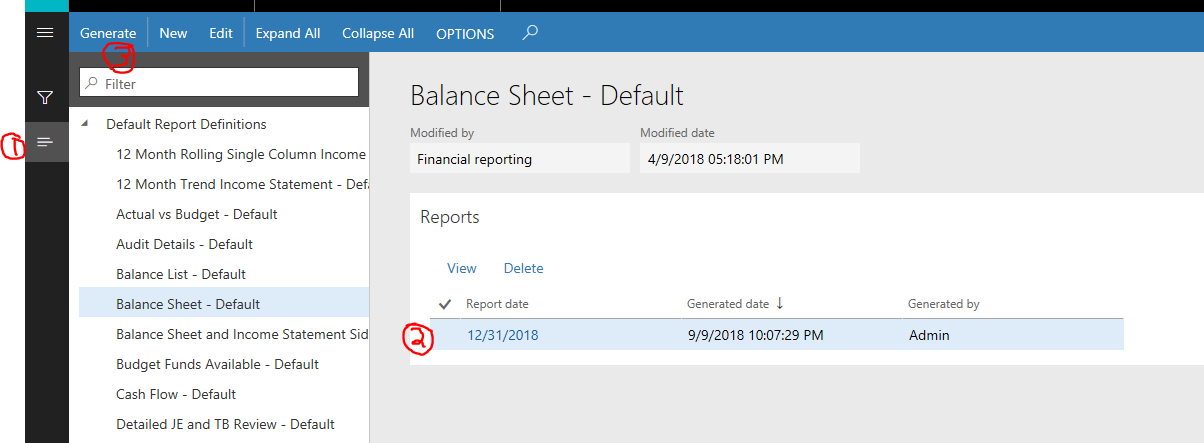
- Select Balance Sheet - Default from the side-bar (use the (1) hamburger sub-menu to show / hide the side-bar if it doesn't appear)
- Make note (2) of reports already generated; not of too much concern given our approach but typically 'normal' users would select an already generated report.
- Use (3) Generate to generate a new report. A Parameters dialog will pop up requesting the Report date; we'll use the end of the current year but that's not a general requirement. Click OK on the Parameters dialog.
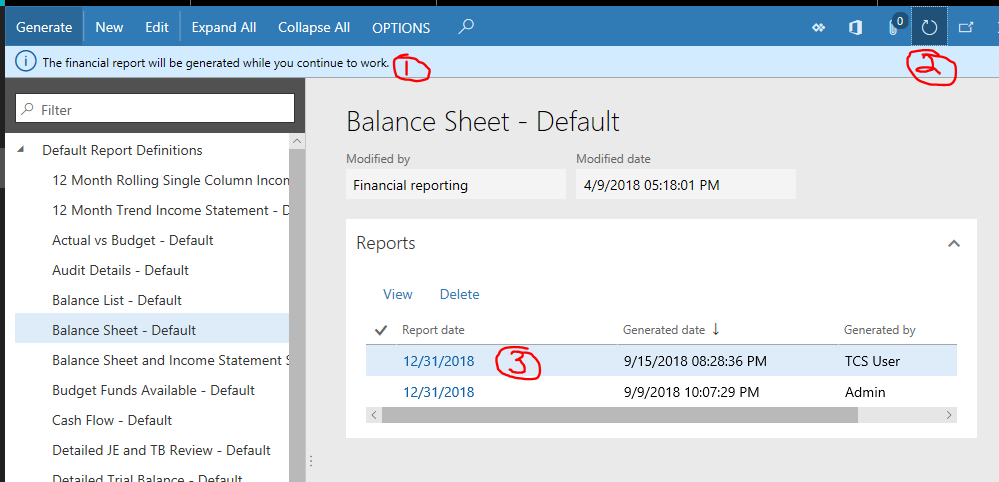
- Below the dark blue menu you will see a light blue message (1) saying "The financial report will be generated while you continue to work"; you can use Dyn365FO for something else or click the refresh button (2) once in awhile. Eventually (3) your report will be ready. Click on the report date for your report to open it up.
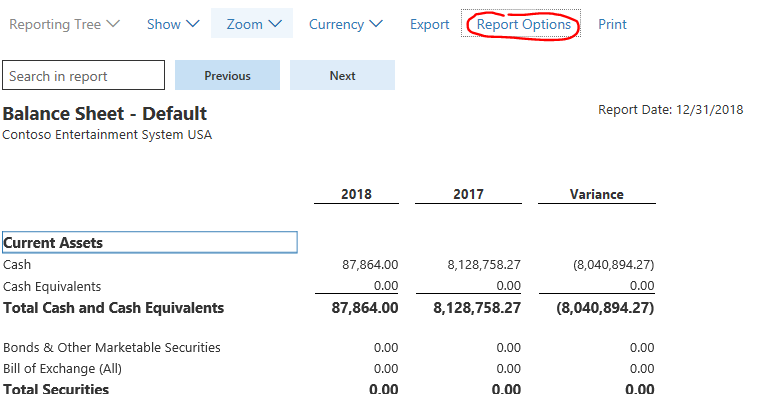
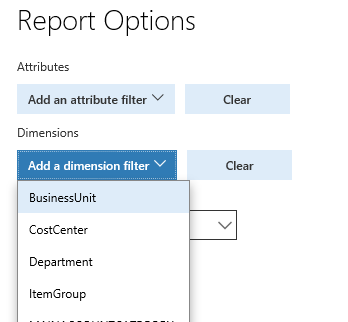
- You get a balance sheet for the USMF Legal Entity Contoso Entertainment Systems USA; very nice but I'm glad I don't have to explain where $8+ million of cash went to between last year and this year ;o) It's just test data so don't expect the SEC to knock. OK, back to work: Use Report Options to narrow the focus to your business unit by (on the Report Options) choosing Add a dimension filler, choosing BusinessUnit, and entering your Business Unit number. Then click OK on the Report Options and the Balance Sheet will be narrowed to your choice.
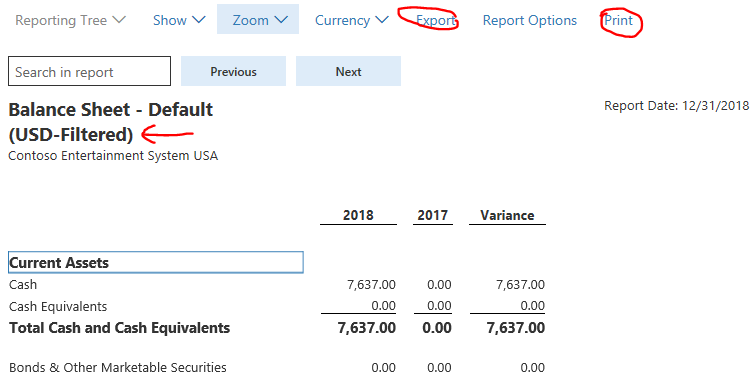
- After a wait is the Balance Sheet for just your Business Unit. It does show as filtered in the title but doesn't (alas) remind you of the filter in the title (e.g., it would be nice to have a printed reminder of how we sliced). If you scroll down in the report you can see the lovely $530 net income for our efforts included in equity. Choose Export to get an Excel spreadsheet download or Print to get an Adobe PDF download.

- Use the X in the upper right hand corner to exit the filtered report and use it again to exit the unfiltered report.
- Prepare an Income Statement
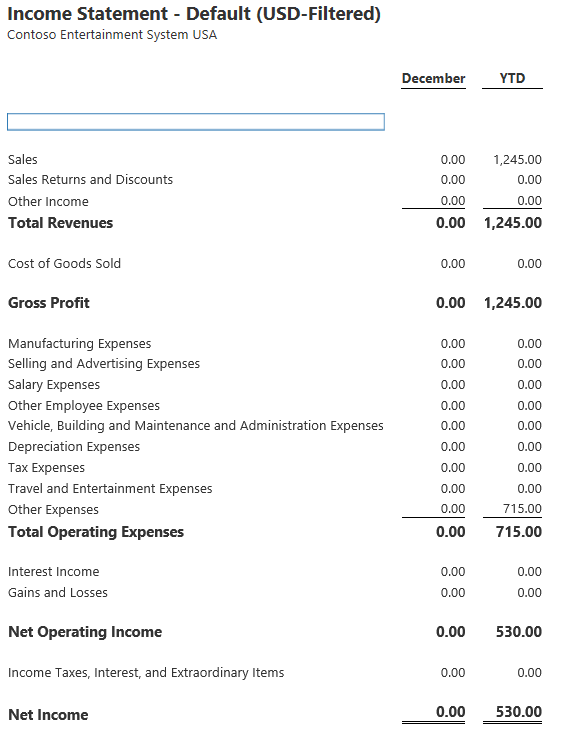
The good news is that once you've built or used one report you know how to do them all. Other than selecting Income Statement - Default instead of Balance Sheet - Default you use Generate, enter a report as of date, wait for the report to generate, use Report Options to select your Business Unit and, well, see below. The report does include the last month's activity which given our 12/31 report date means December. As discussed, not really the right expense categories for the Accounting Succinctly case but the totals are where expected.
Conclusion: We have walked through detailed 'by hand' posting of revenue and expenses and explored how to generate Financial Statements. Streamlining the entry and collection of data based on standard business process is next.