A First Dyn365FO Session
Synopsis: Login, create an employee record, create a business unit & establish a manager, link employee record to user record
Prerequisites: Access to a Dyn365FO subscription with Contoso demo data and fairly broad privilege to access modules, create records, and run transactions. A TechCats Dyn365FO subscription suffices but is not a requirement.
Notes:
- The transactions below are to see some common business scenarios and how they might be handled in an ERP. They are samples and don't necessarily represent the exact steps needed to work with Dyn365FO.
- For most transactions it is important they be done once and only once. If you aren't sure something was saved, look it up. It makes no sense to enter 2 or 3 employee records for one person just to be sure it's entered.
- Some of the naming conventions (e.g., preceding names with your Dyn365FO UserID) come from the fact we are sharing the ERP with other students; the naming scheme just makes it easy to find your own items later when needed.
- In 'real life' use of an ERP it would be highly unusual for a user to process a wide a variety of transactions as we do here. Security rules would limit them to actions associated with their role function in the enterprise. Our goal, however, to to see how Dynamics operates so your user login has been given a wide variety of privilege.
- Since you have significant privilege, follow the guidance but do not change or delete records you did not add unless specifically instructed to.
The exercise guidance below is meant to supplement the video A First Dyn365FO Session which provides step-by-step guidance of "look and feel" of these exercises working with Dyn365FO.
- Access Dyn365 FO
- Log into Dyn365FO and begin from the dashboard. Your banner may differ as may the workspaces available on the dashboard. Make note of the 'hamburger' menu in the upper left-hand corner and be sure you are in the USMF company for this exercise.
- Use the hamburger menu to navigate to Modules | System administration | Users | Users
- Find your user record (e.g., search by Email or User Name). Your instructor may ask for a copy of your Telemetry ID so locate it and, if needed, copy it and paste it into an appropriate document. Also make a note of your Dyn365FO UserID.
- Also note that the Person column is (should be, anyway) empty for your user record. This field connects a user record to an employee record in those cases where the user is also an employee. Don't change this now since you are not yet an employee.
- Exit from users to return to the dashboard, if you want.
- Create your employee record
- Navigate to Modules | Human resources | Workers | Employees
- Use the +New option on the form menu to start a Hire new worker business process
- Enter your first and last name in the form; open the details tab and enter today's date as Employment start date; click the Hire button to add the record
- Find your record in the employees list (simply revisit Modules | Human Resources | Workers | Employees if the employees list doesn't appear). Click on your name and then Edit in the menu to edit your employee record.
- Make a note of your Personnel number assigned by the system; your instructor may ask for a copy plus it might help you navigate later.
- Flesh out your employee record as you like but at a minimum
- Use the Addresses tab to add an address (it does not need to be your real address)
- Use the Contact information tab to add your (real) university email address
- Understand that in general an enterprise's on-boarding business process would dictate that several other items be added / adjusted to establish payroll, compensation, and other details.
- Create a business unit
- Navigate to Modules | Organization administration | Organizations | Operating units
- Use the New pull-down in the menu bar and choose Business unit
- Name your business unit {UserID}BU where {UserID} is your Dyn365FO UserID.
- Make the Manager field your employee record; you can either pull down until you find your Personnel number or start typing your name in the field.
- Make a note of your business unit number and save the form.
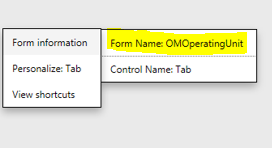
- Tech note: To see where the data for a form comes from, right click and choose the Form Name from Form Information
 . The Form information Administration Tab includes a Query statement field showing how the data was extracted for the form.
 - Connect your user login with your personnel record
- Navigate to Modules | System administration | Users | Users
- Find your user login record and open it for edit
- Make your personnel record the Person field for your user record
- Save the form